About the course
The Descriptors in UiPath Studio course teaches more about user interface automation with UiPath using Modern design experience. In this course, you’ll learn what Descriptors are in UiPath Studio, Advanced options in the selection window, as well as Target element validation. You’ll learn how to configure and fine-tune Descriptor when you encounter difficult situations.
Descriptors in Studio is a two-hour full course. It’s applicable to those who already understand RPA, more specifically UI automation. At the end of the Descriptors in UiPath Studio course, you receive a diploma of completion.
What you will learn in this course
At the end of this course, you should be able to:
- State all the Advanced options of the selection window.
- Explain when to make use of Enforce visibility, Dynamic Text Target and Native Text Target options.
- Explain how to use the Image selection option.
- Define what UI Descriptors are.
- Explain how the Descriptor gets generated.
- Explain how the target element validation works.
- Choose the correct targeting method while automating UI elements.
- Explain how to explore the attributes of UI elements to build the automation logic.
- Fine-tune Descriptor to uniquely identify the required UI elements on the screen.
- Explain what the Object Repository is.
- State the key benefits of an Object Repository.
- Explain the key concepts in the Object Repository: UI Descriptors, UI Elements, Screens, Applications, UI Libraries.
Advanced Options of Selection Window
Modern Design’s aim is to create more reliable UI automation that needs to be adjusted and fixed less often in production.
The selection Option window provides Advanced options such as Enforce visibility, Dynamic Text Target, Native text Target and Image selection mode.
You can use these functionalities and configure them based on the application you are automating or the kind of UI element you are selecting.
These options help in configuring the very reliable descriptor while indicating the target itself.
Let’s learn in detail about the following Advanced options:
- Enforce Visibility
- Dynamic Text Target
- Native Text Target
- Image Selection mode
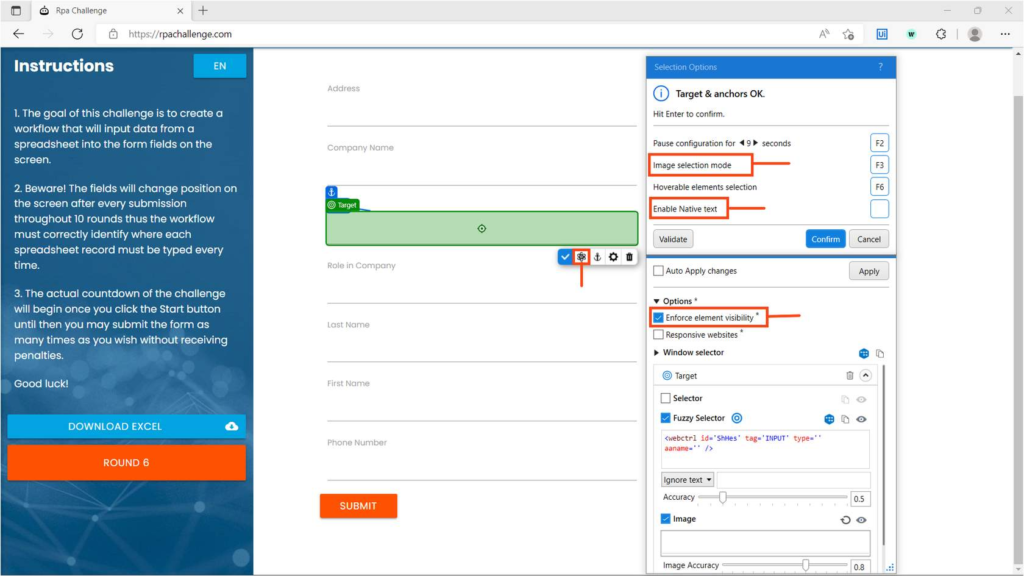
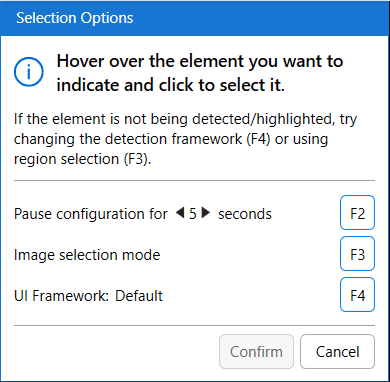
Image selection mode
This feature helps you identify a UI Element in situations where selectors and fuzzy selectors aren’t available, by using only image recognition. Pressing the F3 key can enable image selection.
The image selection mode can be used when automating an application where no selectors are available.
The only targeting method used for Targets and Anchors created with image selection mode is Image.
We can define a selection by holding the left mouse button down and dragging around the area of interest.
Introducing the Descriptors
What’s Target?
- A target is a UI element, you want to interact with to perform some actions on it. For example, a button to click, and a text box to type into. Here, the Button and the Textbox are the targets.
- UI elements refer to all graphical user interface pieces that construct an application.
- UI elements can be any windows, check boxes, text fields or drop-down lists, and so on.
How does a robot identify the correct target?
Targeting methods help identify the correct target element. Modern UI Automation activities use multiple targeting methods to identify the UI Element you want the process to interact with.
The key targeting methods are:
- Selectors: A Selector in UiPath Studio is a feature that enables the identification of the User Interface elements through its address and attributes stored as XML fragments. If we think of GUI Interfaces as a complex hierarchy of containers going from the top node to the specific UI element, the selector XML code acts as an address for the element. Selectors require an exact address match.
- Fuzzy Selectors: Fuzzy selectors enable you to locate strings based on a pattern, rather than on an exact match to your input. This results in a more flexible method of identifying elements and validating selectors according to multiple attributes, even if some are prone to change during the automation process.
- Image: This method reads the array of pixels in a visible region of the application window to identify if it matches the target array.
- Native Text: The targeting method is best suited to automating legacy applications that don’t have correctly defined UI elements. It’s used to detect the position of the text on the screen to perform the required action. When enabled, other targeting methods won’t apply to that particular UI element.
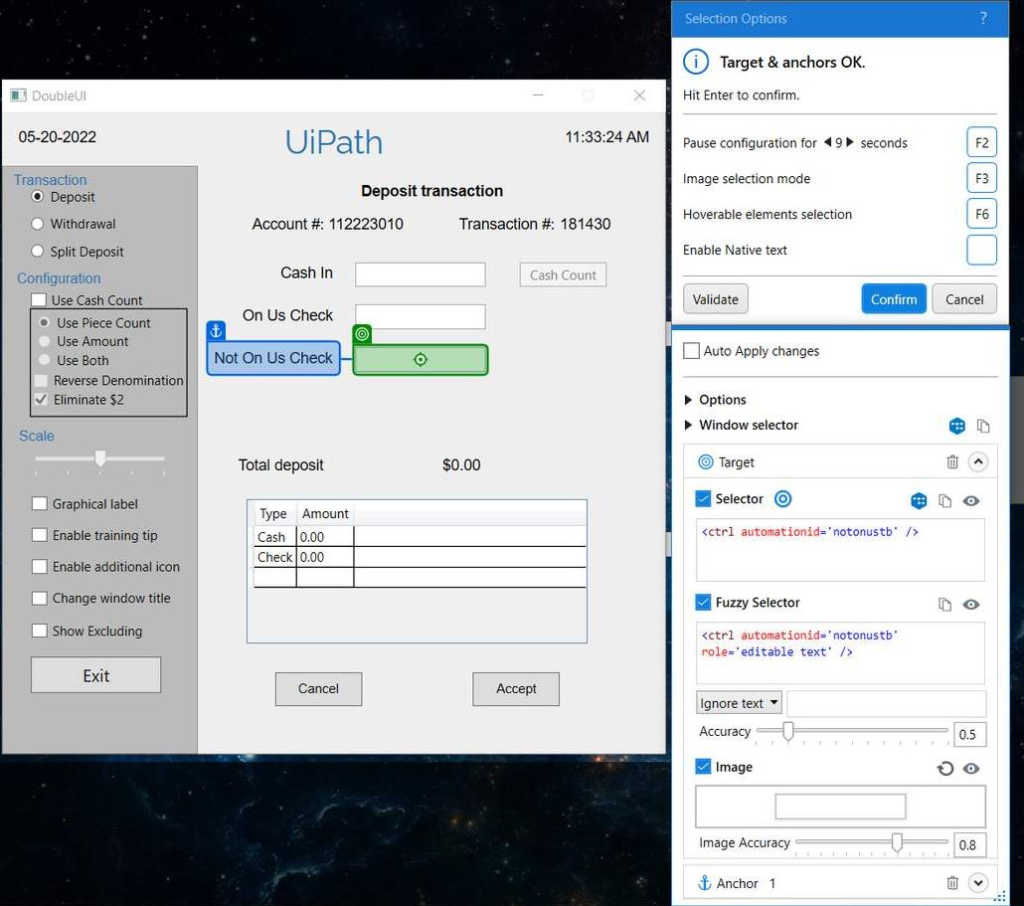
Target Elements may have changing attributes, screen locations, or images. For an increase in precision, we use Anchors. Anchors help us identify the unstable elements we need to work with relative to more stable elements.
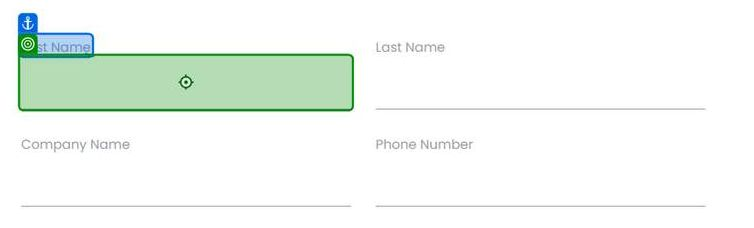
What is an anchor and when should I use it?
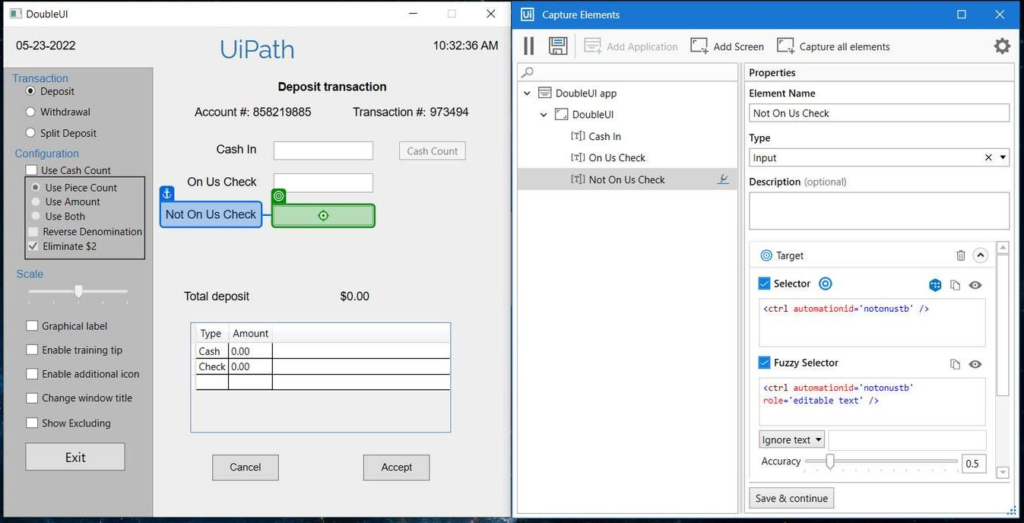
An anchor is another UI element that helps to uniquely identify the target. For example, in the given image, the robot identifies the Input field (Target) highlighted in green by referring to the First Name label (Anchor) highlighted in blue.
In cases where potential conflicts are indicated in the selection window, you can increase the reliability by adding multiple anchors (to a maximum of 3 anchors).
Modern design activities use a Unified Target method to identify UI Elements on the screen. Unified Target is the modern framework for UI automation.
There are many technologies or methods out there that facilitate UI interactions, such as Selectors, Fuzzy Selectors, Images, Texts, computer vision, and so on. By using a unified framework, all the methods are backing each other up for higher reliability, and this way you can ensure that your Robot will overcome any roadblock caused by weak points in selecting the UI element.
Additionally, another advantage of using a single framework for a similar set of activities is that you can use it throughout your workflows as an out-of-the-box solution. Therefore, you don’t need to spend time configuring and considering the particularities of each method used as it is easy to use running in the background.
The unified target uses a couple of frameworks to identify UI elements.
UI Frameworks
By default, a proprietary framework is used to access the target application window, however, if a target is not detected, Studio comes with two alternatives:
- AA(Active Accessibility) – for older applications.
- UIA (Microsoft UI Automation) – for newer applications.
After you select a target, the option to change the UI Framework is no longer available.
- A Unified Target is made up of at least one target, with optional anchors. So basically one or more UI Elements.
- Each UI element is found using a stack of targeting methods: Selectors, Fuzzy Selectors, Images.
- These three targeting methods are redundant to one another. This means that they all try to identify the target element simultaneously, and whichever finds the target first, that targeting method will be considered.
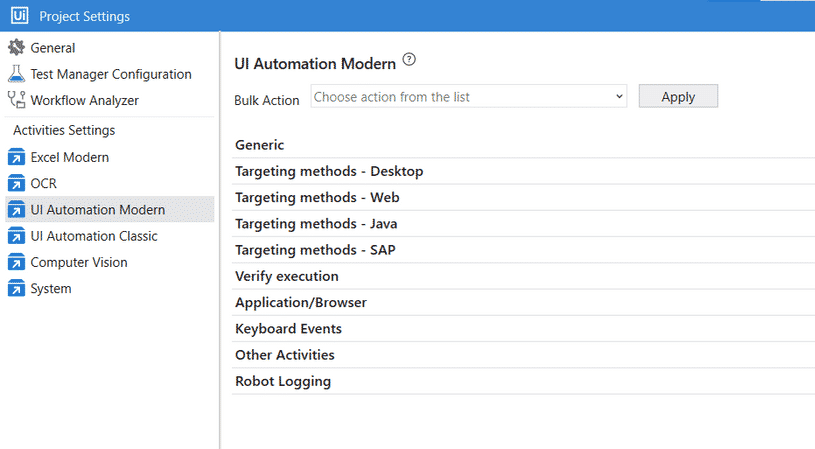
The project Settings determine which targeting methods to use in target detection. If you wish to change some of the default settings, you can do that by accessing:
Project settings option -> UI Automation Modern.
Separate sections are available in the project settings for different types of target applications as shown in the picture.
Refer to the below table to get a quick glance at the important Default Settings regarding targeting methods for some of the important target applications.
| Target Application type | Default Targeting method used |
|---|---|
| Web – applies to web browsers. | Fuzzy Selectors Image |
| Desktop (UIA) – applies to desktop applications that use Microsoft UI Automation technology. | Selectors Fuzzy SelectorsImage |
| Desktop (AA) – applies to desktop applications that use Microsoft Active Accessibility technology. | Fuzzy Selectors ImageFuzzy SelctorsImage |
| Desktop (Win32) – applies to native desktop applications. | Fuzzy Selectors ImageFuzzy SelctorsImage |
The under-the-hood process of finding a UI element uses all three methods of targeting available: Selector, Fuzzy Selector, and Image.
- The robot tries to find a UI element (either a target or anchor). It searches with all three targeting methods in parallel.
- The method that finds the UI Element first will be the one used to identify the respective target or anchor.
Note: the targeting process happens again at runtime, with all three methods searching in parallel for the target. The targeting method that seems to be the fastest at design time might change at runtime.
Validating the Descriptor
Show all matches
This feature helps to find all the matches for the selected element that can be found in the automated application. You can use this option to debug your UI descriptors or selections.
- The Show All Matches feature highlights all candidates for a targeting method.
- Show all matches will be very helpful when we are fine-tuning targeting methods.
Target element validation
Target element validation enables you to check how effective the current selection is in identifying the target by inspecting it with all selected methods and anchors.
The result of the validation is displayed at the top of the Selection Options window. If adjustments are needed, a message is displayed with information on how to improve the selection.
The performance of each method is displayed in the Advanced Settings section of the Selection Options window using one of the following icons:

- The method was the first to successfully identify the element (the fastest)
- The method successfully identified the element but it wasn’t the first one
- The method identified duplicates with the equivalent anchor, but at least one other anchor has worked
- The method failed to identify the element
Fine-tuning the Descriptors
You can fine-tune the Unified targeting method by fine-tuning the Target and Anchor selectors, fuzzy selectors, and images, based on the application UI or criteria to identify the UI element.
Fine-tuning of the Fuzzy Selector Targeting method.
The Fuzzy Selector is very similar to a Selector. But, Fuzzy Selector identifies the UI element even with fuzzy match instead of perfectly matched like in Selector. As a result, the Fuzzy Selector can output multiple elements. Wherein Selector identifies the single UI element.
The Fuzzy Selector can be edited from its dedicated section in the Selection Options window.
You can fine-tune the Fuzzy selector in the following ways:
- By adjusting the matching accuracy of the Fuzzy Selector from the Accuracy slider.
- By using wildcards (?,*) in the fuzzy selector generated for the required target.
‘?’ replaces one character, and ‘*’ replaces zero or more characters. - By using Variable and Argument in the Fuzzy Selector for the required target. You can create a new variable/Argument or use the existing variable from the context menu of the Fuzzy selector.
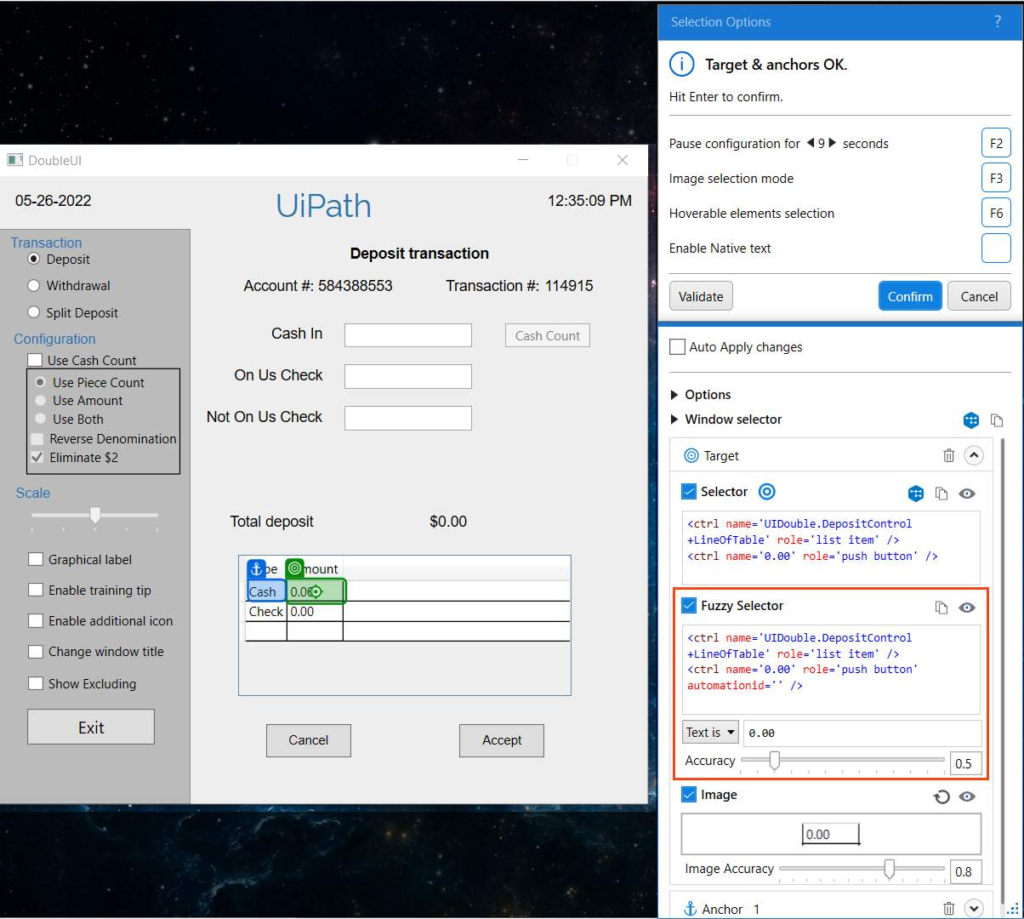
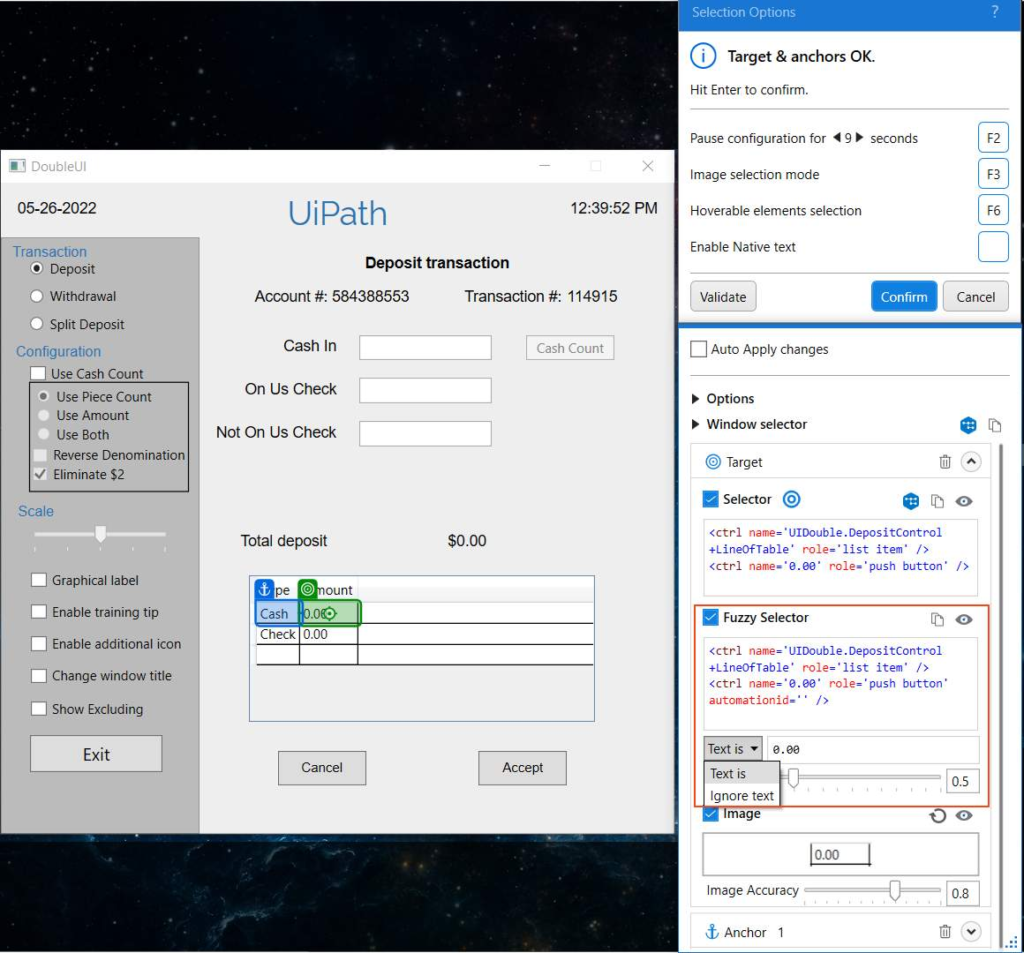
If the indicated element contains text, the text is displayed in the input box below the Fuzzy Selector edit window.
The drop-down menu next to the input box enables you to select between the two option Text is and Ignore text.
For the UI element to be considered as a match when Text is selected in the input box, the mentioned text must be present in the UI element at runtime.
You can use wildcards (?,*) when editing it.
Selecting Ignore text, ignores the text specified in the input box.
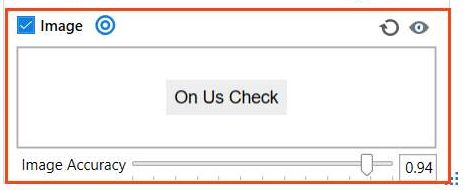
You can fine-tune the Image targeting method by adjusting the Image Accuracy with its corresponding slider.
Introducing the Object Repository
The Object Repository allows for creating and reusing UI taxonomies inside and across automation projects. With Object Repository you can build a UI API for your application and share it with your team within minutes.
The key features of the Object Repository are:
Reliability: Capture Elements recorder captures elements, together with their anchors. With the help of anchors, objects keep their reliability in case the application receives a slightly new UI.
Easy to Update:
- UI elements across the project are managed, updated, and modified from a centralized place.
- Upgrade application and process UI elements in one go with UI libraries.
Reusability:
- All locally stored elements can be reused at the project level.
- Descriptors for all the UI elements across the project/application are managed, updated, and modified from a centralized place.
- Extract elements into UI libraries and install them as a dependency on your projects when you want to reuse them at a global level. You can also take a reusability-first approach and start by creating UI Libraries with the elements you’ll need across all your automation projects.
UI Descriptors
UI Descriptors are extracted directly from an app using the Capture Elements recorder or from activities in the workflow and added to a structured schema that groups them by Applications, Application Versions, Screens, and UI Elements. Out of this taxonomy structure, only Screens and Elements hold descriptor information. The rest are used for grouping and their role is to ensure upgrades between versions of an application.
UI Applications
A UI Application is a targeted application that can have multiple versions and each version can have multiple screens. Versioned applications are used to group Screens and UI Elements. They do not contain Descriptor information.
Screens
Screens are UI Scopes that are either extracted from activities inside the workflow or are generated at element capture time. A Screen groups together multiple UI Elements belonging to the same screen.
UI Elements
A UI Element is the encapsulation of a UI Descriptor, needed to identify the element on the screen, and additional metadata needed to describe the element.
UI Libraries
A UI Library is an encapsulation of elements grouped by applications, application versions, and screens. The elements you define can be extracted as a UI Library, and after publishing, can be installed in other projects as a dependency.
Facts
An anchor element and a target element, when identified using their respective targeting methods, form a Unique Pair. The Target and Anchor pair is known as the Descriptor.
…
What is the type of selector that’s generated while using Modern design activities?
Answer: A partial selector
…
The key benefits of the Object repository are Reliability, Centralized UI Libraries, and Reusability.
…
What is the functionality of the Show all matches option?
Answer: Highlights all User Interface or UI Elements identified by the selected targeting method.
…
The convert to dynamic text target option is available under Target Element.
…
You’re building automation for the application which is available on the client machine. You don’t have direct access to that. Also, you aren’t allowed to install Studio on the Client machine on which the application is present.
In this scenario, which targeting method can you use to identify the required UI element for processes?
Answer: Image
…
In the Unified target method, what is the order in which the robot uses targeting methods to identify the selected UI element?
Answer: All targeting methods start Identifying the target element simultaneously, and whichever finds the target first, that targeting method will be considered.
Congratulation