
About the course
In this course, you will learn about the main targeting method for UI Automation activities: selectors. We’ll first get familiar with the concept, then we’ll get to more in-depth topics, such as the types of selectors, the UI Explorer, the Property Explorer, and configuring selectors to handle different situations.
What you will learn in this course
At the end of this course, you should be able to:
- Explain a selector and its structure.
- Explain various types of selectors and their settings when automating.
- Describe how to explore the attributes of the User Interface element.
- Explain various approaches to fine-tune selectors to make them reliable.
- Fine-tune selectors to improve element identification precision.
Introducing Selectors
A selector in UiPath Studio is a feature that enables the identification of a specific User Interface element through its address and attributes. These are stored as XML fragments.
The element identification is done to perform specific activities in an automation project. The selectors are generated automatically every time we use an activity that interacts with graphical user interface elements.
We can think of the element identification process achieved through selectors as a postman that delivers letters to a certain address. In order for the postman to deliver the letters, a specific path is required and must contain structured and hierarchized details such as Country > City > Zip Code > Street Name > Street Number > Apartment Number. Similarly, UiPath Studio requires a detailed path to a specific element within the user interface.
What are some business scenarios in which selectors are useful?
Most of the time when an automated process involves working with UI elements, selectors are used. Typical activities include:
- Clicking buttons.
- Inputting or scraping text in/from a field on a website.
- Choosing an option from a drop-down list.
The structure of a selector
User Interfaces (UIs) are built using a series of containers nested one inside the other. Let’s take the example of a selector for the First name input field in MyCRM Application, and try to understand the meaning of the structure.
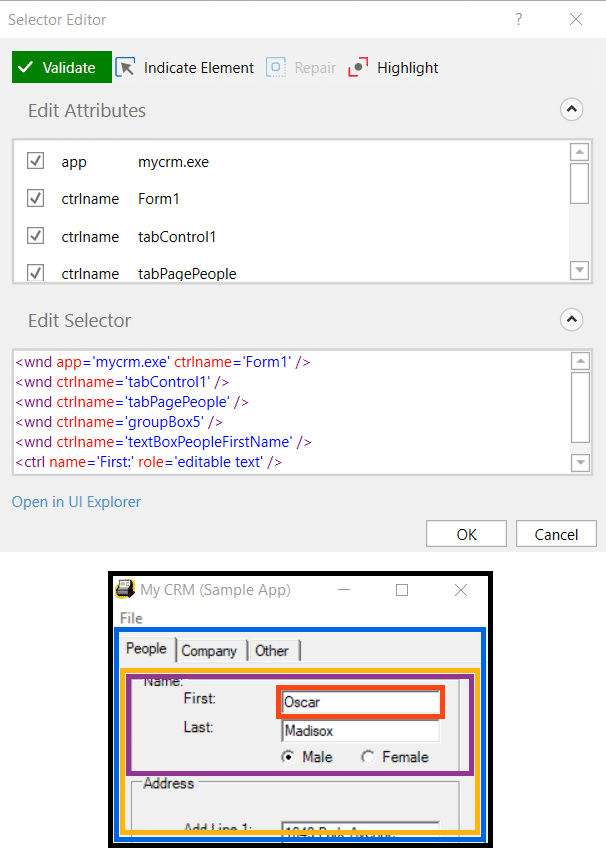
Root Node: This corresponds to the highest-level container, e.g. an application.
<wnd app=’mycrm.exe’ ctrlname=’Form1′ />
Node 2: This identifies the entire area in which data can be edited.
<wnd ctrlname=’tabControl1′ />
Node 3: As you can see, the control area has 3 tabs. This node identifies the People tab.
<wnd ctrlname=’tagPagePeople’ />
Node 4: This identifies the Name category of the People tab. As you can see, there are other categories as well, and the Address is visible.
<wnd ctrlname=’groupBox5′ />
Node 5: This is in fact the GUI element that interests us. It corresponds to the editable field fo the First field.
<wnd ctrlname=’textBoxPeopleFirstName’ />
<ctrl name=’First:’ role=’editable text’ />
Tags & Attributes of Selectors
As you saw, selectors are made of nodes. And each node is made of tags and attributes. Let’s take an example to explain the two. Below is a selector node.
<webctrl parentid=‘slide-list-container’ tag=‘A’ aaname=‘Details’ class=‘btn-dwnl’ />
Tags
- Nodes in the selector XML fragment.
- Correspond to a visual element on the screen.
- The first node is the app window.
- The last node is the element itself.
For example:
- wnd (window)
- html (web page)
- ctrl (control)
- webctrl (web page control)
- java (Java application control)
Attributes
Every attribute has a name and a value. You should use only attributes with constant or known values.
For example:
- parentid=‘slide-list-container’
- tag=‘A’
- aaname=‘Details’
- class=‘btn-dwnl’
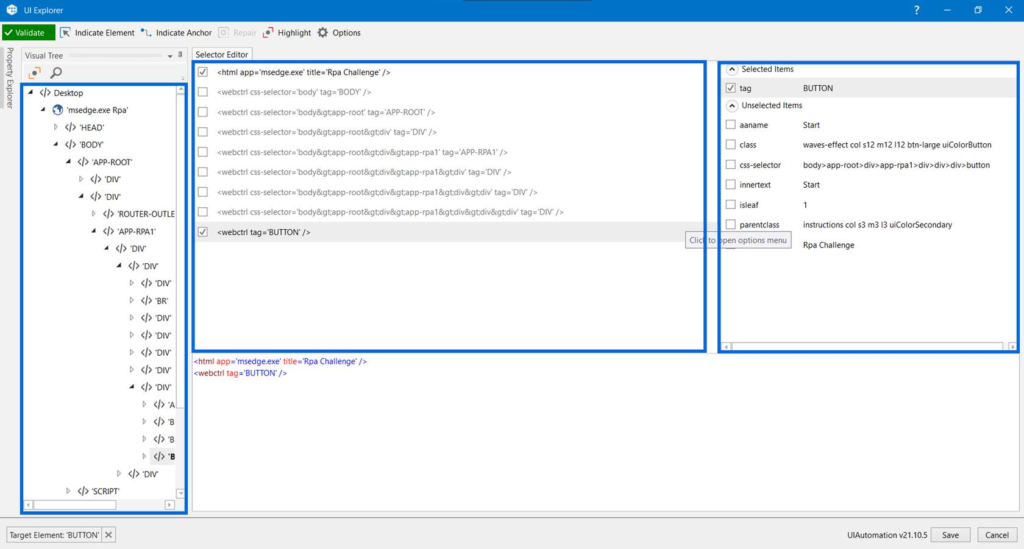
The UI Explorer
The UI Explorer is the functionality in UiPath Studio that allows you to analyze and edit selectors. It contains a status button showing users the state of the selector, a visual tree panel that displays a navigable UI of each application running at that moment, as well as the selected UI element. The UI Explorer displays all the available tags and attributes and gives you the option to check them in or out.
The UI Explorer can be used whenever the selectors that were automatically generated are not stable or reliable enough. For example, when:
- The selectors change from one execution to another.
- The selectors might change following product updates.
- The selectors use unreliable info, such as index.
The UI frameworks
In order to return the best selector for the element of interest, we can switch between the different UI frameworks available in Ui Explorer. You can find the UI frameworks option in the Options tab of the Ui Explorer.
Default: This is the proprietary method which usually works correctly with all types of user interfaces.
Active Accessibility: This represents an earlier solution from Microsoft that makes apps accessible. It is recommended when using legacy software if the default framework does not work as expected.
UI Automation: This is the improved accessibility model from Microsoft, which is recommended when using newer applications in case the default framework does not work as expected.
The Property Explorer
The Property Explorer is a functionality of the UI Explorer that displays all the attributes of a certain UI element, including those that are not displayed in the selector, like position, visibility, inner text, and so on.
- When you want to start an activity after a certain attribute changed its value (using the Wait Attribute activity).
- When you want to change the value of an attribute on a webpage, like its visibility (using the Set Attribute activity).
- When you want to check the state of a certain UI element by checking on an attribute (using the Get Attribute activity).
Types of Selectors
As previously presented, selectors are automatically generated when UI elements are indicated inside activities or when the recorder is used. Knowing the difference between full and partial selectors is very important when activities generated inside containers are moved outside, or the other way around.
The UI automation classic experience containers are Attach Window, Attach Browser and Open Browser.
Full Selectors
- Contain all the tags and attributes needed to identify a UI element, including the top-level window.
- Generated by the Basic Recorder.
- Best suited when the actions performed require switching between multiple windows.
Partial Selectors
- Don’t contain the tags and attributes of the top-level window, thus the activities with partial selectors must be enclosed in containers.
- Generated by the Desktop Recorder.
- Best suited for performing multiple actions in the same window.
When are partial and full selectors used?
The best example of using a partial selector would be simple automation where the deployed workflow only performs actions in the same application without shifting through multiple windows, like a simple CRM.
On the other hand, if the workflow would actually be required to interact with multiple windows, like the CRM in the example above and a document. This would make the UI elements dispersed in multiple windows, so full selectors would be required.
Fine-tuning Selectors
Fine-tuning is the process of refining selectors in order to have the workflow correctly executed in situations in which the generated selector is unreliable, too specific or too sensitive with regard to system changes.
It mainly consists of small simple changes that have a larger impact on the overall process, such as adding wildcards, using the repair function or using variables in selectors.
- The workflow uses files that have timestamps in the name.
- The environment in which a workflow was built has different parameters than the production environment (for example, the application version).
- The use of dynamic selectors would improve the reliability and robustness of the automation.
When exactly is fine-tuning of selectors required?
- Dynamically generated selectors – As it happens with some websites, the values of the attributes change with each visit.
- Selectors being too specific – Some selectors are automatically generated with the name of the file or with a value that changes. Here, placeholders are very useful.
- System changes – Some selectors contain the version of the application or another element that changes when the application is updated.
- Selectors using IDX – The IDX is the index of the current element in a container with multiple similar elements. This might change when a new element appears in the same container.
How can we fine-tune selectors?
Using Wildcards: Wildcards are symbols that enable you to replace zero or multiple characters in a string. These are useful when dealing with dynamically-changing attributes in a selector.
- Asterisk (*) – replaces zero or more characters
- Question mark (?) – replaces a single character
Using Variables: Variables are used as a property for the attribute of your target tag. This allows selectors to easily identify a target element based on the value of the variable or argument, and not an exact string, which might change.
The variable can be changed to interact with a different element, without changing the selector itself.
Now working with variables is made easier with the nicer variable support. To add a variable to a field’s value, right-click the value and choose ‘Use variable’. Next, choose the variable from the drop-down and confirm to use the variable.
Using Index Variables: Index variables are used to access UI elements based on their numerical position in the list or to access specific UI elements in an array or structure. They work by identifying the attributes of the UI elements which are numeric values that are consecutive.
When data is stored in a list structure and you want to refer to them based on their position or numeric value, we use Index Variables. They are stored in a defined variable with a specific numeric value. For example:
webctrl tableCol=’6′ tag=’TD’tableRow='{{int_Index}}’/>
Consider the example of a UI element that changes state, position or ID every time the workflow is run. For these, there are other approaches:
Anchor Base: This is very useful in cases in which the attribute values are not reliable (are generated at each execution, for example), but there is a UI element that is stable and linked to the target UI element.
The Anchor Base activity has two parts, one to locate the anchor UI element (like ‘Find Element’), and the second to perform the desired activity
Relative Selector: This activity will basically incorporate the information about the anchor’s selector in the selector of the target UI element. However, the new selector will probably need additional editing, as some nodes of the first selector will still be in the new one. The solution is to have that part (like a dynamic ID) removed, and the selector will stabilize using the anchor’s selector.
Visual tree hierarchy: The hierarchy in the Visual Tree can improve the reliability of a selector by including the tags and attributes of the element that is above in the hierarchy.
This is very useful when the target UI element’s selector is not reliable, but the selector of the UI element right above in the hierarchy is. However, again, the selector needs further editing and validation, as the dynamic part needs to be removed and, at the same time, you need to make sure that the target element can be identified with a unique attribute.
Find children: This activity can identify all the children of an element that is more stable. Since its output is the collection of children, you will need to come up with a mechanism to identify only the target UI element (using one of its attributes, that makes is unique between the children, but wouldn’t be enough to identify it universally).
Facts
The Property Explorer panel displays all the attributes that a specified UI object can have, including the ones that do not appear in the selector. This information can be useful when fine-tuning selectors or building UI Synchronization.
…
Activities like Get Attribute and Set Web Attribute can be used to develop process logic based on UI Element attributes.
…
Find element Is to Find the Element by a selector, It can wait Specified UI Element gets active and even it can wait for the Specified UI Element Appears physically too (But to a specified extent). Throws an error if the UiElement can not be found.
Returns Ui Elemnet Type Variable.
Element Exists is to tell us whether the Specified Ui Element exists or not, Waits for a specified time to check whether it exists or not, and if YES or NO it goes to the next activity. Doesn’t throw an error.
Returns Boolean Type Variable.
…
UI Automation Activity can either use a selector of type string in the Selector property, or an object of type UI Element in the Element property, but not both, to identify a target.
Congratulation