UI Automation with Studio

About the course
Through this set of UI automation tutorials, you’ll learn about UI automation with UiPath. You’ll practice both the modern design experience and the classic design experience. Learn to effectively build User Interface automation projects using activities like Use Application Browser, Click, Type Into, Get Text, Check APP state and so on. This course also covers the corresponding Input methods, such as Chromium API, Simulate, Send Windows Messages. And the Output methods such as Full text, Native and OCR.
This UiPath Studio guide builds on what you’ve already learned about RPA development. It teaches you about UI Automation with Studio to continue your automation journey.
Product alignment: this course was built using the 2021.10 product version of UiPath Studio and applies to newer versions as well.
What you will learn in this course
Through this UI Automation course, you’ll learn about these foundational UI automation topics in three modules:
- Introduction to UI Automation: this module offers RPA Developers all the basic concepts related to user interface automation. This module covers:
- What UI Automation is.
- Key concepts of UI Automation.
- The difference between modern and classic design experiences.
- How to change the design experience in Studio.
- Configure a default design experience at the Studio level for all new automation projects.
2. UI Automation with the Modern Design Experience: this module covers building UI Automation projects using the modern design experience in Studio. This module covers:
- Selection Option Screen in the modern design experience.
- Input and Output activities in the modern design experience.
- Input method and activities in the modern design experience.
- Output method and activities in the modern design experience.
- UI synchronization activities in the modern design experience.
3. UI Automation with the Classic Design Experience: this module covers building UI Automation projects using the classic design experience in Studio. This module covers:
- Introduction to classic design experience.
- Input methods and activities in the classic design experience.
- Output methods and actions in the classic design experience.
- UI synchronization activities in the classic design experience.
Important take outs
Useful websites: https://rpachallenge.com, https://uibank.uipath.com, http://www.rpasamples.com/suppliers
User interface or graphical user interface automation (UI Automation) refers to the process of interacting with graphical elements within applications by simulating mouse and keyboard controls.
Just as human users use applications through activities such as clicking, typing, or selecting text, UiPath Robots can be configured in UiPath Studio by RPA Developers to perform the same tasks faster and error-free.
Through a deep integration between UiPath and all of the major GUI frameworks from Win32 to WPF, HTML, and Java, RPA Developers can easily automate all types of desktop applications.
UiPath recognizes graphical objects by its own platform-specific attributes and provides a unified GUI automation API that works the same way everywhere.
How Does UI Automation Work?
UI Automation activities
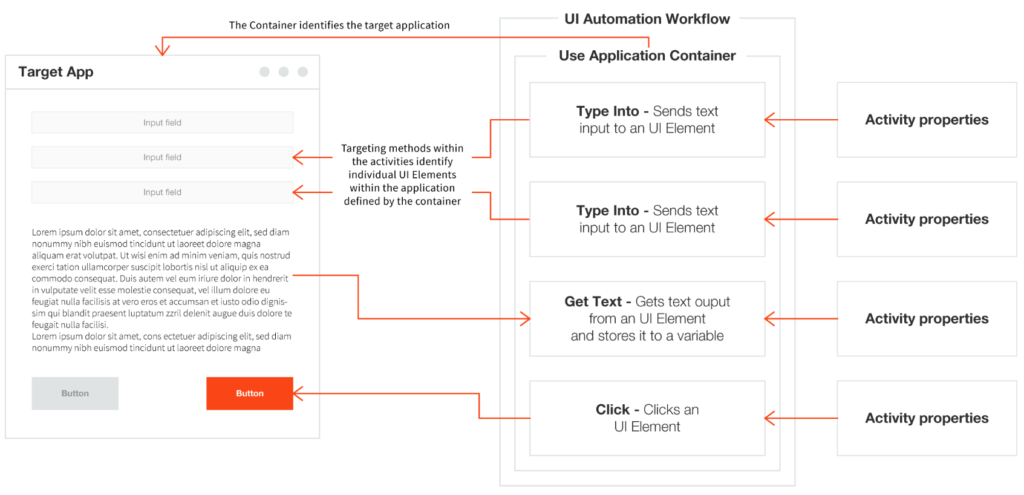
UI Automation activities let developers quickly write instructions for the Robot to interact with the interfaces of various applications. Activities can be split into the following categories:
- Containers – These are activities that identify the browsers or apps the process needs to interact with. All activities included within a Container will execute on the same application. Some examples are Open Browser, Attach Browser, Open Application, or Use Application/Browser.
- Input Activities – These activities send input to UI elements. They can be used to click, check, type into, send hotkeys, and so on.
- Output Activities – These activities get information from GUI Elements. They can instruct the Robot to get the text by using various methods, get structured data, or get the UI Elements containing images.
- Synchronization Activities – They help you create triggers based on the UI behaviour, thus enabling the Robot to execute certain actions when specific events occur on a machine.
Properties (How to do it): Properties control how the Robot executes an activity. Here you can control if you want the Robot to wait before or after executing the activity, what element to execute the activity on, how much to wait if it cannot find the element and so on.
| Property | What it does |
| DelayAfter/DelayBefore | How many milliseconds the robot waits before or after executing the activity. |
| ContinueOnError | Will an exception encountered while executing the activity be thrown or ignored? For example, if the element isn’t found, will the robot throw an error and stop the execution, or will it ignore it and continue? |
| Target | Provides several properties related to identifying the target UI Element. |
| Timeout (milliseconds) | How many milliseconds will the Robot try to perform an action on a UI element. |
| SendWindowsMessages/Simulate Type | What input method do we use for input activities. |
| Output | It Stores the output of the activity in the form of variables. |
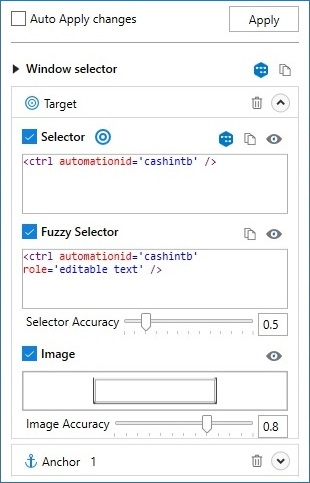
Targeting Methods: The targeting methods help the robot identify the correct UI element to perform the action. The key targeting methods are:
- Selectors
- Fuzzy Selectors
- Image
- Native Text
Input and Output Methods: Input and output methods tell the Robot what technology to use to send input or get output from an interface. They can make a huge difference in terms of how reliable your UI Automation is, how fast it works, and most importantly if it can run only on a foreground window or a background window too.
Every time we insert data into an application, or we send a command to a system to produce a change (or to continue), we perform an input action. Output actions are used to extract data (in general, as text) from a UI element. Output methods are what enable output actions to extract data from UI elements.
UiPath provides several methods to perform input and output actions. These methods control several important aspects of our automation:
- How fast will the action be performed?
- Can the action run on a background or a hidden window?
- Does it interfere with the user?
- Is it compatible with all apps?
Different methods are available for input and output activities.
Input methods
Hardware Events
- Clicking: the mouse cursor moves across the screen.
- Typing: the keyboard driver is used to type individual characters.
- The attended user cannot touch the mouse or keyboard during the automation.
- It has a lower speed and load times can impact accuracy.
- Compatible with all applications. (strong point)
- Supports special keys like ‘Enter’, ‘Tab’, and other hotkeys. (strong point)
- It won’t be able to erase previously written text automatically. (limitation)
- Does not work in the background. (limitation)
SendWindowMessages
- Replays the window messages that the target application receives when the mouse/keyboard is used.
- Clicking and typing occur instantly.
- Works in the background.
- Comparable to the Default method in terms of speed.
- Supports special keys like ‘Enter’, ‘Tab’, and other hotkeys. (strong point)
- Users can work on other activities during the execution of the automated processes. (strong point)
- It won’t be able to erase previously written text automatically. (limitation)
- Works only with applications that respond to Window Messages. (limitation)
Simulate
- Uses the technology of the target application (the API level) to send instructions.
- Clicking and typing occur instantly.
- It is the fastest targeting method.
- Works in the background.
- Will automatically erase previously written text. (strong point)
- Users can work on other activities during the execution of the automated processes. (strong point)
- Does not support special keys like ‘Enter’, ‘Tab’, and other hotkeys. (limitation)
- Compatibility is lower than the other two methods. (limitation)
Chromium API
- It is a browser automation input method based on the Devtools protocol.
- It allows direct communication with the browser, in turn, fewer communication channels, and thus improved automation reliability.
- Works in the background.
- Users can work on other activities during the execution of the automated processes.
Output methods
Full Text
The FullText method is the default method and is good enough in most cases. It is the fastest, it can extract hidden text, it has 100% accuracy, and can work in the background.
Native
The Native method is compatible with applications that use Graphics Design Interface (GDI), the Microsoft API used for representing graphical objects. It doesn’t extract hidden text and it cannot work in the background; and just like FullText, it doesn’t support virtual environments.
OCR
OCR (or Optical Character Recognition) is the only output method that works with virtual environments and with “reading” text from images. Its technology relies on recognizing each character and its position. On the other hand, it cannot work in the background, it cannot extract hidden text, and its speed is by far the lowest.
Recorders: The Recorders will help you develop UI Automation much faster by following your manual interaction with the GUI step by step and translating it into a sequence of Studio activities.
Scraping Wizards helps you extract structured data automatically.
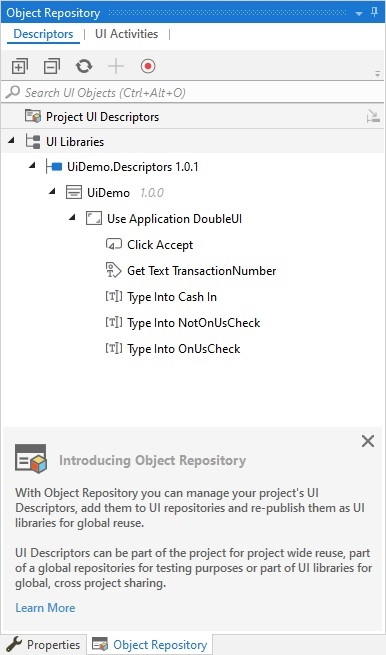
The Object Repository is a more advanced feature, but it’s useful to know about it early. It allows developers to store UI Element identifiers in a repository, fine-tune them and share them with colleagues for much faster UI Automation development and project updates.
AI Computer Vision is an AI skill that enables all UiPath Robots to see every element on a computer screen.
What are design experiences?
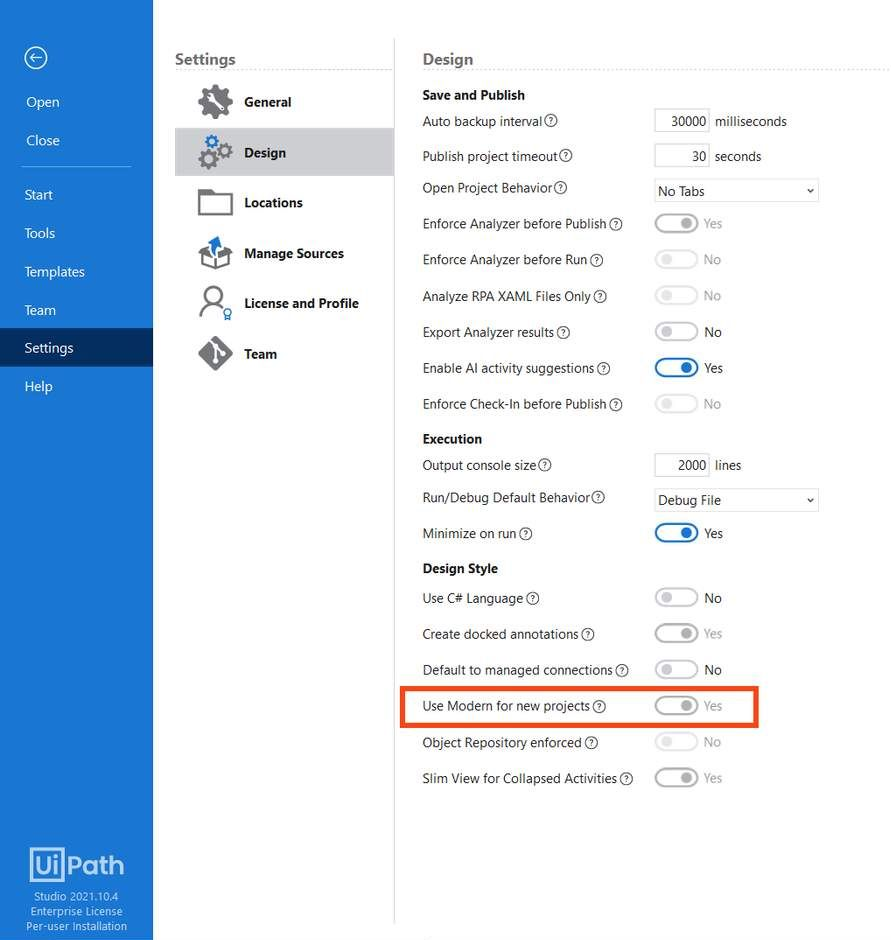
UiPath Studio offers two ways of developing UI Automation: the Modern Design Experience and the Classic Design Experience.
These design experiences help developers adapt to different contexts while building UI Automation. The default design experience in Studio is the Modern Design Experience.
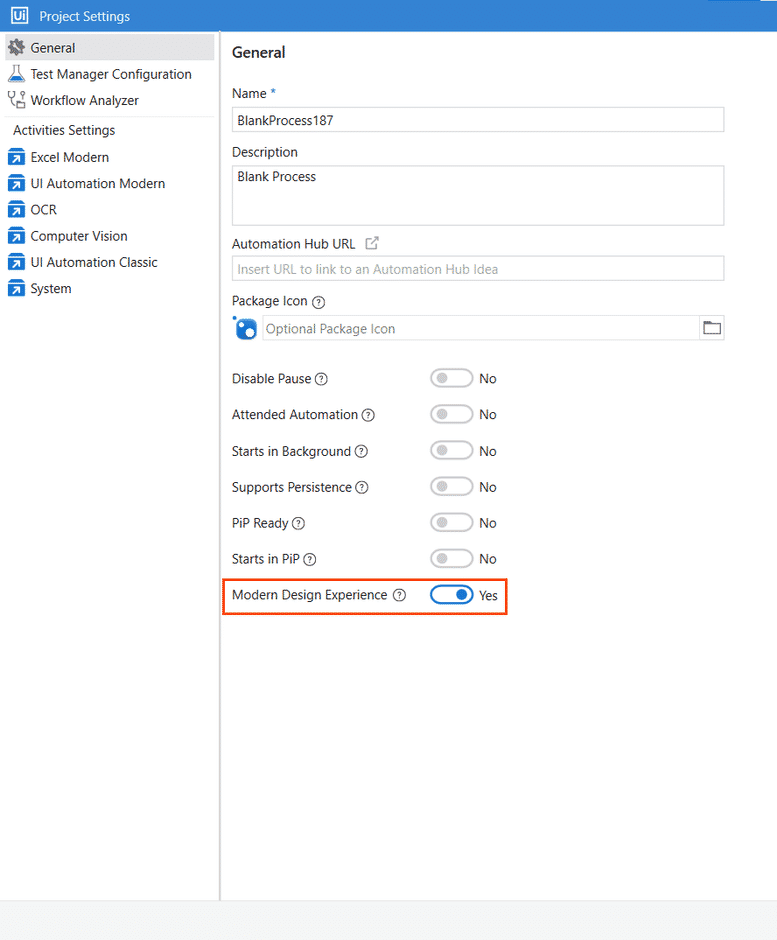
We can change the design experience based on the requirement, in two ways:
- Change the default design experience at the Studio level.
- Change the design experience at the Project level.


UI Automation activities
A separate set of UI activities is available by default in each experience. Regardless of the selected experience of an automation project, modern or classic, the other set of activities can be enabled.
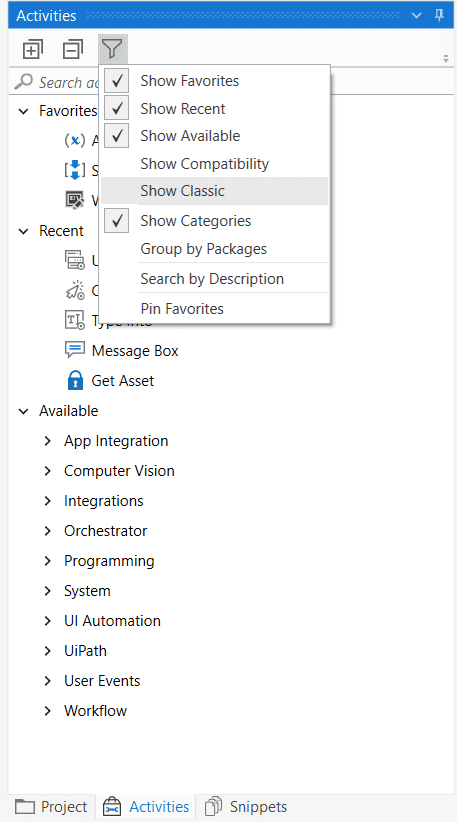
The default experience is Modern. To view the classic activities simply select “Show Classic” from the Activities panel, or vice versa.
In the below image, we are enabling the Classic UI Activities.
Note that modern activities only work within containers, while classic activities can be configured to work without containers as well.
Activity properties
Modern and Classic activities have slightly different properties because of different targeting methods and Activity behaviours.
Targeting methods
Modern activities will cycle through the stacked options Selector, Fuzzy Selector, and Image to determine the most reliable option. This targeting technology is called the Unified Targeting method.
Modern Design also uses the Native Text targeting method. It helps to automate legacy applications, in which UI elements aren’t correctly defined.
When using classic activities, the selector is the most common targeting method for UI elements (99% of the time). In scenarios where it’s unreliable, you have the possibility to manually change the updated Activity to use fuzzy selectors or anchors.
Input methods
Both design experiences use input methods (Hardware events, SendWindowMessages, and Simulate). A new input method, ChromiumAPI, is used in the modern experience.
Recorders and wizards
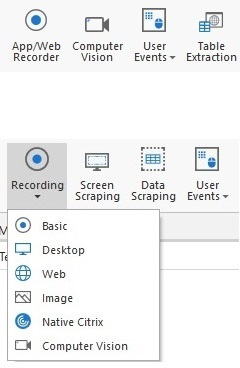
Modern and classic offer two different sets of recorders:
- Modern experience – The App/Web and Computer Vision recorders are available.
- Classic experience – The Basic, Desktop, Web, Image, Native Citrix, and Computer Vision recorders are available.
When it comes to Scraping Wizards:
- Modern experience – The Table Extraction wizard is available for data scraping.
- Classic experience – The Data Scraping and Screen Scraping wizards are available.
The object repository
The Object Repository ensures the management, reusability, and reliability of UI elements by capturing them as objects in a repository, sharable across projects. The Object Repository is only available in the Modern Design Experience.
Basics of UI Automation in the modern design experience
ChromiumAPI
ChromiumAPI is a browser automation input method based on the Devtools protocol. It is 100% compatible with Chromium-based browsers, like Chrome or Edge. Basically, it works on any website or application executed inside the Chromium browser. It works with the following activities:
- Use Application/Browser
- Click
- Type Into
- Hover
- Keyboard Shortcuts
When you are using ChromiumAPI, you need the latest UiPath Edge extension and the 2021.10.3 release or higher UiPath.UIAutomation.Activities package.
Benefits of using ChromiumAPI over Hardware Events
Reliability: Using the Hardware Events input method for all the input actions, these actions communicate with the operating system’s mouse/keyboard input stream. From there, the events are sent to the target application, the browser, which parses them and sends them further to the web pages.
With ChromiumAPI, the events are sent directly to the browser. Therefore, this input method removes a communication channel that can fail (as any other communication channel).
Works in the background: The Hardware Events input method needs elements to be on the screen, focused, and in the foreground. The ChromiumAPI doesn’t require it as it works while the browser is minimized and/or another tab is focused.
Benefits of using ChromiumAPI over Simulate input method
- It allows sending hotkeys directly to the browser, wherein Simulate doesn’t support hotkeys.
- The Clear before typing property is natural with this method since it doesn’t empty the target element field by default.
- Click with modifiers actions are more efficient and reliable.
How each input method differs from one another.
| Input Method | Compatibility | Background Execution | Speed | Hotkey Support | Auto Empty Field |
|---|---|---|---|---|---|
| Hardware Events | 100% – all types of applications. | No | 50% | Yes | No |
| SendWindowMessages | 80% | Yes | 50% | Yes | No |
| Simulate | 99% – web apps 60% – desktop apps | Yes | 100% | No | Yes |
| ChromiumAPI | 100% – Chrome and Edge browsers | Yes | 50% | Yes | Yes |
The Use Application/Browser Activity has another option listed under Input mode: the Background mode.
Consider the following scenario: an RPA Developer has built automation to work in the foreground. Because of the stability of the app, they receive requests to make the automation work in the background.
What are the steps the RPA Developer needs to take to make it work in the background?
- Test the input methods which work in the background to identify the most suitable one.
- Change the input method for each UI activity.
- Disable any targeting fallbacks that require focus, like an image.
- Minimize the app after the card is initialized if it was opened by the process.
The above workaround requires a fair amount of knowledge, testing, and skill. Fortunately, there’s an easier way to make this work with the Background mode.
How does the Background mode work?
It runs all the activities inside the Do block of Use application browser card in the background by using either Simulate or ChromiumAPI as an input method.
Keep in mind that the Background mode isn’t a foolproof solution, because some UI actions aren’t compatible with working with background mode.
The actions which aren’t compatible with working with background mode are:
- Any activities using images as a targeting method.
- Native text automation.
- All keyboard shortcuts.
- Minimizing opened applications.
- The Take Screenshot Activity.
Background mode is available only for Use application browser Activity.
So, what happens when the automation built includes these actions which aren’t compatible with the Background mode?
The automation will run as expected, without breaking or throwing exceptions. But the activities with which the Background mode isn’t compatible will be run in the foreground. Once execution completes, it’ll return to background mode.
The good news is that there’s another option available, namely Picture-in-Picture (PIP).
The Picture-in-Picture feature allows you to run attended processes in collaboration with the Robot. A process started in the Picture-in-Picture mode runs in an isolated Windows session, thus allowing you to use the machine while the process is running.
Using the app/web recorder wizard
The second method of automating user interfaces is by using the App/web Recorder feature. This is a tool that can help you save a lot of time when automating your business processes. This functionality enables you to easily capture your actions on the screen and translate them into activities in Studio.
The workflows generated by the recorder can then be modified by editing the configuration of the activities recorder so that you can easily replay and reuse them in as many other tasks as you need.
Can we use the Recorder for all other applications’ automation?
The recorder works only on automating user interfaces. It will not work for tasks involving Excel, Outlook, Word, or files and folders automation, where you still need to add the activities one by one.
For example, if you work with a CRM, the recorder is a great tool to decrease the time you spend building the automation project. You will still have to add manually the control flow part of the project.
How each output method differs from one another.
| Output Method | FULL TEXT | NATIVE | OCR |
|---|---|---|---|
| Default method and Compatibility | It is the Default method and good enough in most cases. | Compatible with applications that use Graphics Design Interface (GDI), the Microsoft API is used for representing graphical objects. | OCR (or Optical Character Recognition) is the only output method that works with virtual environments and with “reading” text from images. Its technology relies on recognizing each character and its position. |
| Automation Speed | Fastest compared to the other two methods. | Somewhat slower than FullText. | By far the slowest. |
| Accuracy | 100% accuracy. | 100% accuracy on the applications that support GDI. | Accuracy varies from one text to another, by changing the settings we can improve the results. |
| Running in Background | Works in the background. | Cannot work in the background. | Cannot work in the background. |
| Hidden Text | Can extract hidden text (for example, the options in a drop-down list). | Cannot extract hidden text. | Cannot extract hidden text. |
| Virtual Environment | Doesn’t support virtual environments. | Doesn’t support virtual environments. | Works with virtual environments and with “reading” text from images. |
| Text position and Formatting | Doesn’t capture text position and formatting. | Can extract the text position and formatting (including text colour) | Like the Native method, it also captures the text position. |
| Other | The method offers the option to ignore the hidden message and capture only the visible text. | By default, it can process all known characters as separators (comma, space, and so on), but when only certain separators are specified, it can ignore all the others. | The OCR method has two default engines that can be used alternatively: Google Tesseract, Microsoft MODI. There are additional OCR engines that can be installed free of charge (such as Omnipage and Abbyy Embedded) or paid (IntelligentOCR offered by Abbyy). |
These output methods remain the same for the Classic Design Experience.
Output Activities
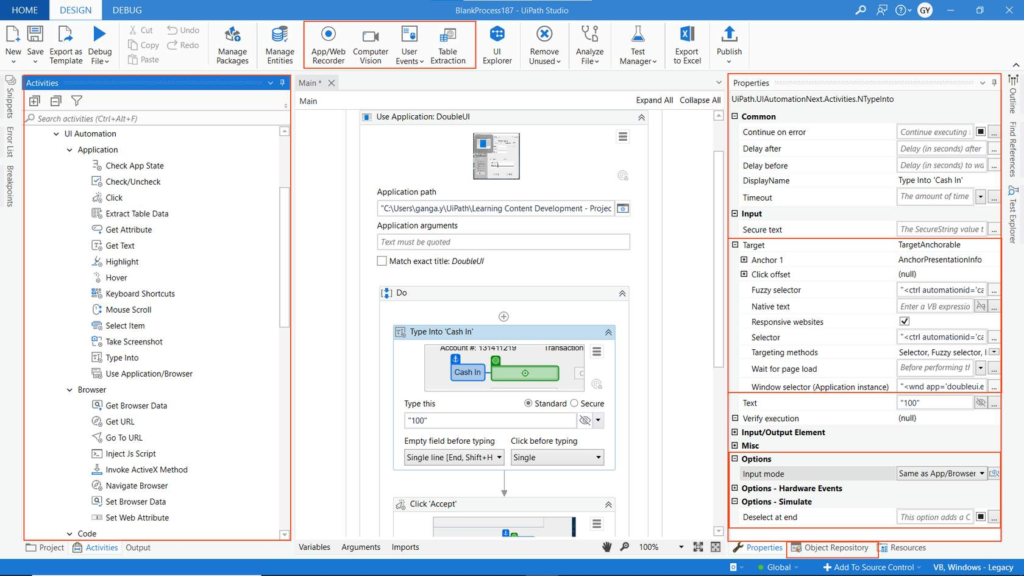
Get Text Activity: Extracts and copy the text from a UI element. It should be added inside a Use Application/Browser Activity.
You can use this Activity to extract data using the following output methods:
- Default: tries all the output methods, and the first one to return a text is used.
- Text attribute: uses the “text” attribute of the UI element.
- Fulltext: this method offers the option to Ignore hidden text, which can be activated by selecting its respective check box.
- Native: this method enables you to Allow formatting and retrieve the screen coordinates of the words by selecting the checkboxes for each of these features.
Get Text Activity provides the Extraction Preview wizard. This wizard enables you to choose the suitable output method based on the result displayed in the Extraction Preview wizard.
CV Get Text: Extracts the text from a specified UI element position based on an anchor. It should be added inside a CV Screen Scope Activity.
It supports the following methods:
- OCR: uses the OCR engine specified in the parent CV Screen Scope activity to retrieve the text.
- Select – all: extract the entire text by using the clipboard. This simulates a copy/paste action and can only be used on selectable text, on either local or remote sessions.
- Select – row: extract the text in the entire row by using the clipboard. This simulates a copy/paste action and can only be used on selectable text, on either local or remote sessions.
Get OCR Text: Extracts a string and its information from an indicated UI element or image using the OCR screen scraping method. This Activity gets generated automatically when performing screen scraping, along with a container. By default, the Google OCR engine is used.
Using the Table Extraction wizard
The modern design experience leverages Table Extraction as a scraping method to extract structured data from applications and web pages.
The Check app state
The Check App State action is useful for situations in which you want to check whether the application you are going to automate exists.
Think about different tabs in an application or browser. While adding activities to your workflow, you want to make sure you are targeting the correct app elements or browser tabs. Additionally, in case your element is not found you can add another set of activities to be performed.
To increase the time for the target element to be found before executing the next activities you can update the value of the Wait for option.
Verify execution
The Verify Execution feature allows you to make sure that the UI automation activities (for example, a Click or a Type Into) are executed with the expected outcome.
Click Activity (Classic Experience)
The Click activity is used to click a specified UI element. It offers below options:
- AlterIfDisabled: if enabled, the click action is executed even if the specified UI element is disabled.
- CursorMotionType: It specifies the type of motion performed by the mouse cursor. There are two options:
- Instant: the cursor jumps to the destination. This is the default option.
- Smooth: the cursor moves in increments.
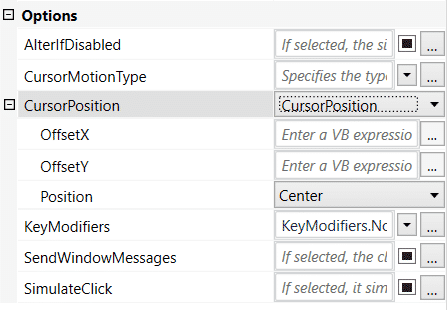
- CursorPosition: It describes the starting point of the cursor to which offsets from OffsetX and OffsetY properties are added. The following options are available: TopLeft, TopRight, BottomLeft, BottomRight and Center. The default option is Center.
- OffsetX: Horizontal displacement of the cursor position.
- OffsetY: Vertical displacement of the cursor position.
- KeyModifiers: enables users to add a key modifier so that the specific key is pressed while performing the action. The following options are available: Alt, Ctrl, Shift, and Win.
- SendWindowMessages: if enabled, the click action is executed by sending a specific message to the target application. This input method can work in the background.
- SimulateClick: if enabled, it simulates the click action by using the technology of the target application. This input method can work in the background.
Type Into Activity (Classic Experience)
The Type Into activity sends keystrokes (text) to a specified UI element. It also supports special keys. It offers below options:
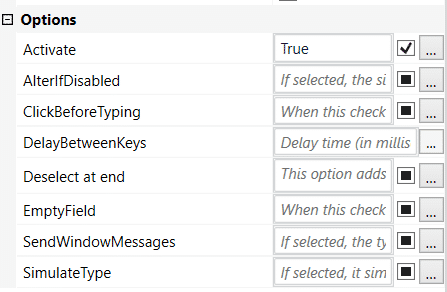
- Activate: if enabled, the specified UI element is brought to the foreground and activated before the text is written. If this is not enabled, then the activity will type into the currently active window. This property is enabled by default.
- AlterIfDisabled: if enabled, the action is executed even if the specified UI element is disabled.
- ClickBeforeTyping: if enabled, the specified UI element is clicked before the text is written.
- DelayBetweenkeys: the delay (in milliseconds) between each key is typed.
- Deselect at end: It adds a Complete event after the text entry to trigger certain UI responses.
- EmptyField: If enabled, all previously-existing content in the UI element is erased before writing the text.
- SendWindowMessages: if enabled, the type into action is executed by sending a specific message to the target application. This input method can work in the background.
- SimulateType: if enabled, it simulates the type action by using the technology of the target application. This input method can work in the background.
Send Hotkey (Classic Experience)
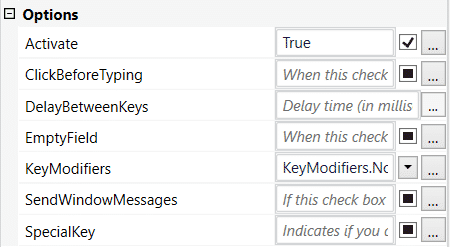
The Send Hotkey activity is used to send keyboard shortcuts to a UI element. It offers below options:
- Activate: if enabled, the specified UI element is brought to the foreground and activated before the text is written.
- ClickBeforeTyping: if enabled, the specified UI element is clicked before the text is written.
- DelayBetweenKeys: the delay (in milliseconds) between each key is typed.
- EmptyField: If enabled, all previously-existing content in the UI element is erased before writing the text.
- KeyModifiers: enables users to add a key modifier so that the specific key is pressed while performing the action. The following options are available: Alt, Ctrl, Shift, and Win.
- SendWindowMessages: if enabled, the type into action is executed by sending a specific message to the target application. This input method can work in the background.
- SpecialKey: indicates if users are using a special key in the keyboard shortcut. Examples: back, tab, enter, and so on.
All the input actions share several properties such as:
- Delay: This can be used to set a delay before or after the click.
- WaitForReady: can be configured to wait for the target to become ready by verifying certain application tags.
UI synchronization activities (Classic Experience)
Find Element: Waits for the specified UI element to appear on the screen (to be in the foreground) and returns it as a UiElement variable. This is useful when a certain action needs to be performed on the Ui Element found.
Element Exists:
Enables you to verify if a UI element exists, even if it is not visible. It returns a Boolean variable, which makes it very useful in ‘If statement’ activities.
Wait Element Vanish: Waits for the specified UI element to disappear from the screen. It’s an alternative to Find Element. For example: when the disappearance of an element (a loading sign) is more reliable than the appearance of another element.
On Element Appear: A container that waits for a UI element to appear and enables you to perform multiple actions within it.
On Element Vanish: A container that enables you to perform one or multiple actions after a specified UI element vanishes.
Text Exists: Checks if a text is found in a given UI element. There’s an alternative version of this that uses OCR technology to check for a given UI element. This is useful when UI elements are not accessible other than images.
Facts
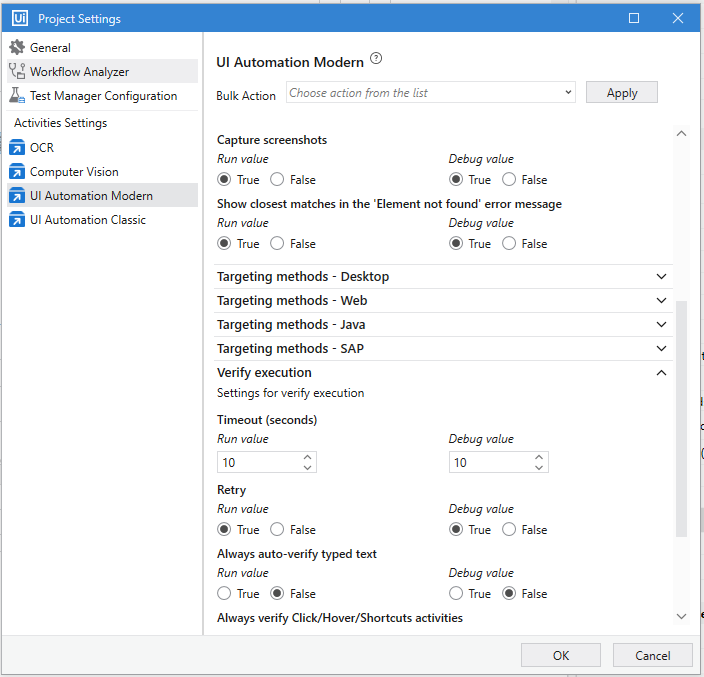
The default Timeout for Verify Execution is 10 seconds and it can be changed at the project level by selecting Project Settings > UI Automation Modern > Verify execution.
…
Check App state activity can be used outside the scope of the Use application browser card.
…
App/web recorder does support image targeting method.
…
Target: UI element required to perform UI actions on it.
UI Element Highlighted in YELLOW: Duplicates found.
UI Element Highlighted in RED: Target element not identified.
Anchor: UI element which helps to uniquely identify the correct UI element required for UI action.
Image Selection Mode: Uses only Image as a targeting method to identify the UI element.
Hoverable Selection: Helps to indicate hoverable elements.
Pause: Helps to adjust required settings in the application while indicating the Target.
…
If the Get Text activity has the scraping method set to Full Text and the application is minimized, the text is extracted successfully.
…
Use Send Hotkey activities only inside containers to avoid sending them to unintended places. (applies to the Classic Experience)
Congratulation