In Bizagi, we refer to process instances as cases and present them to end users. By default, we assign an internal sequence for numbering each case and display it as the “Case Number”. This ensures that each case is uniquely identified and eliminates the possibility of duplication or conflicts. However, you can customize the numbering sequence to meet your specific needs. We also recommend using prefixes when using sequences to prevent duplication in case numbering. We allow you to define customized sequences, including prefixes and suffixes, for all or some of your processes.
Case numbering options
Bizagi allows you to customize your case numbers in two ways: using sequences or rules. With sequences, you can define a counting pattern and add prefixes and suffixes to it. The sequence is incremented by a value you specify each time a new case is created. With rules, you can use expressions to define the case number, which allows for more advanced calculations and validations. The case number is the number displayed to end users in the Work Portal, while Bizagi assigns a separate, automatically generated identifier, known as the Case ID, for internal numbering.
Case numbering configuration like a pro
An experienced developer will always choose the second option, and that is to write a rule that will generate a customized case number. Here is how to do it step by step:
- Create a new sequence for your process. Go to the Sequences menu, and add a new sequence:

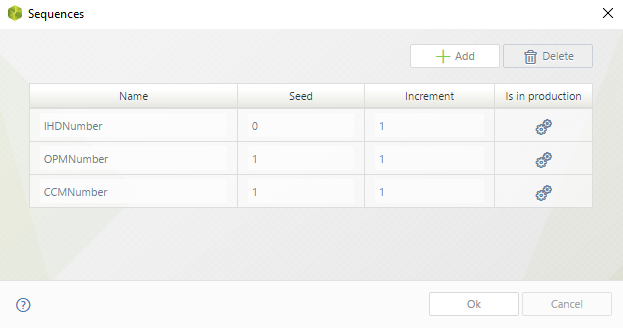
Give it a proper name: ProcessAcronym_CaseSequence
2. Go to the Case Numbering menu to create the customized Case Number.

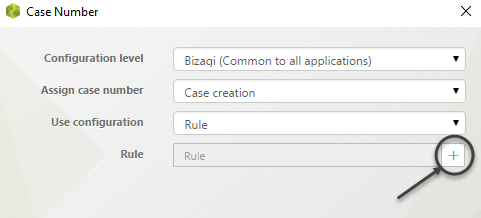
Create a new rule and copy the following code:
// Description: This rules generates and returns the Case Number for the all the processes
// Input: N/A
// Output: Case number
var sRuleName;
var sSeq, sYear, sMonth, sDay, sDate, sYear2, sSequence, sParentCaseNumber, sProcessName;
var iIdProcess;
sRuleName = "ML_SetCaseNumber";
//
sSeq = "";
sYear = DateTime.Today.Year;
sMonth = DateTime.Today.Month.ToString().PadLeft(2,'0');
sDay = DateTime.Today.Day.ToString().PadLeft(2,'0');
sDate = sYear + sMonth + sDay;
//
iIdProcess = Me.Case.ProcessDefinition.Id,
sProcessName = Me.Case.ProcessDefinition.Name;
//
if(sProcessName == "[Name of the process / not the display name]")
{
	sSequence = CHelper.GetNextSeqValueStr("[ProcessAcronym_CaseSequence]").ToString().PadLeft(7,'0');
	sSeq = "[ProcessAcronym]-" + sSequence;
}
// for another process
else if (sProcessName == "[Name of the process / not the display name]")
{
	sSequence = CHelper.GetNextSeqValueStr("[ProcessAcronym_CaseSequence]").ToString().PadLeft(7,'0');
	sSeq = "[ProcessAcronym]-" + sSequence;
}
else
{
	sSeq = "OTHER-" + sDate;
}
sSeq;
Conclusion
The rule retrieves the current date, identifies the process being created, and formats the case number accordingly. The case identifiers will display in the desired format in the Work Portal. The case number format will look like this ABC-0000001 and it will go with the following series ABC-0000002, ABC-0000003, and so on.
Feel free to customize it as you prefer. Add the date or other bits of information, it’s up to you. For more tips and tricks check our list of articles.