Learn how to install Node.js and npm on Windows with this comprehensive step-by-step guide. Follow these instructions to set up the environment for JavaScript application development effortlessly.
Introduction
JavaScript has emerged as a dominant language in the software development industry, attracting front-end developers who aspire to build feature-rich user interfaces through JavaScript development and interact with back-end web services using AJAX. The non-blocking nature of JavaScript has prompted server-side web developers to adopt JavaScript as their primary choice.
In the present day, numerous front-end frameworks such as VueJS, React, Angular, and more heavily rely on JavaScript as their core language, leveraging its code optimization capabilities. Opting for JavaScript development services not only presents ample opportunities to become proficient in a single language but also facilitates the creation of “full-stack” web applications. At the heart of this revolution in server-side JavaScript lies Node.js, serving as a vital key.
What is Node.js
Node.js is a versatile platform that enables the execution of JavaScript code beyond the confines of a web browser. Powered by Chrome’s V8 JavaScript runtime engine, it empowers developers to create server-side JavaScript applications. Node.js provides all the necessary components to run JavaScript programs seamlessly. Notably, enterprises favour Node.js over alternative backend technologies due to its extensive library of over 50,000 NPM packages. This vast collection enhances development efficiency, scalability, speed, and cost-effectiveness.
What is NPM
NPM, or Node Package Manager, serves as the default package manager for Node.js. Essentially, Node.js provides a runtime environment for JavaScript, enabling developers to build scalable applications within specified timeframes.
NPM facilitates the sharing and utilization of open-source packages among web developers, serving as a command-line utility for package installation, dependency management, and version control within projects.
Key Components of NPM:
- Website: The official NPM website offers a repository of packages for projects. Users can create and manage profiles to access a wide range of packages.
- Command Line Interface (CLI): The CLI allows interaction with NPM packages and repositories directly from the terminal of your computer.
- Registry: NPM maintains an extensive database of JavaScript projects and associated metadata. This registry enables the utilization of any supported NPM registry and grants the ability to utilize third-party registries, subject to their respective terms of use.
How to Install Node.js and NPM on Windows?
When it comes to JavaScript application development on Windows, having Node.js and npm (Node Package Manager) installed is essential. In this detailed guide, we will walk you through the process of installing Node.js and npm on your Windows system. By following these steps, you’ll have a robust environment ready for seamless JavaScript development.
Step 1: Downloading the Node.js Installer
To begin, visit the official Node.js website and navigate to the Downloads section. Opt for the “LTS” (Long-Term Support) version, ensuring stability and reliability. Choose the appropriate installer based on your Windows operating system, whether it’s 32-bit or 64-bit.

Step 2: Running the Installer
After downloading the installer, locate the file and initiate it by double-clicking. In case of a security prompt, grant permission to proceed. The Node.js Setup Wizard will appear, guiding you through the installation process. We recommend accepting the default settings, including the installation location. This ensures a smooth setup without any complications.
Step 3: Verifying the Installation
Once the installation completes, the Node.js Setup Wizard will display a “Completed” message. Ensure that the checkbox for installing the necessary tools for Node.js application development is checked. To confirm a successful installation, open the Command Prompt and run the following commands:
# How to check which Node.Js version installed on your computre
node -v

# List available Node.js versions
nvm list

# Install latest LTS version
nvm install lts

# Use the installed version
nvm use lts

# How to check which NPM version runs on your pc
npm -v

# How to install the latest npm version (globally)
npm install -g npm@latest
If you see version numbers displayed, it means Node.js and npm have been successfully installed on your Windows system.
In my case I encountered the following error when running the npm command:
npm : File C:\Program Files\nodejs\npm.ps1 cannot be loaded because running scripts is disabled on this system. For more information, see about_Execution_Policies at
https:/go.microsoft.com/fwlink/?LinkID=135170.
This error occurs because PowerShell’s execution policy is preventing npm scripts from running. Here’s how to fix it:
Solution : Change PowerShell Execution Policy
- Open PowerShell as Administrator (right-click on PowerShell and select “Run as Administrator”)
- Run one of these commands to change the execution policy:
# Option 1: Set policy for current user only (recommended for security)
Set-ExecutionPolicy -Scope CurrentUser -ExecutionPolicy RemoteSigned

# Option 2: Set policy system-wide (less secure but more convenient)
Set-ExecutionPolicy -Scope LocalMachine -ExecutionPolicy RemoteSigned- Type “Y” to confirm the change
- Try running npm again
Advanced: Working with Node Version Manager (NVM)
NVM, the Node.js Version Manager, simplifies the installation and management of different Node.js versions. It allows easy switching between versions while preserving globally installed packages specific to each version. On the other hand, NPM, the Node Package Manager, is a tool used for installing libraries, plugins, frameworks, and applications. It facilitates the process of adding and managing dependencies within your Node.js projects.
To manage multiple Node.js versions using NVM, follow these steps:
- Download NVM for Windows.
- Select the nvm-setup.zip file.
- Unzip the file and run the installer.
- Verify the successful installation of NVM by opening a new command prompt and typing “nvm”.
- Install Node.js using NVM by executing the command “nvm install <version>”. Replace “<version>” with the desired Node.js version or use “latest” for the latest stable version.
- Check the installed Node.js version by typing “node -v”.
- (Optional) If you wish to install another version of Node.js, repeat Step 5 with a different version.
- View the list of installed Node.js versions by running the command “nvm list”.
- To use a specific Node.js version, execute “nvm use <version>” with the desired version.
nvm
nvm list
nvm install <version>
nvm use <version>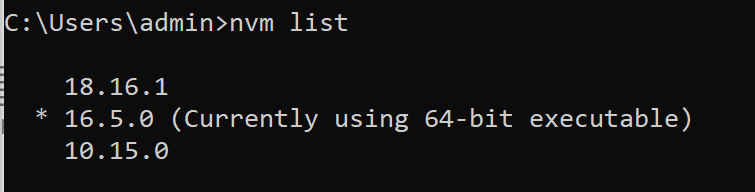
More useful commands
# To view globally installed packages on your system
npm list -g --depth=0

# To see the global install location
npm root -g

# To check npm's configuration, including global paths
npm config list

# How to uninstall a Node.js package
npm uninstall -g package-name
Conclusion
You have now successfully installed Node.js and NPM on your Windows system, paving the way for smooth JavaScript application development. By following this step-by-step guide, you’ve established a robust environment for your coding endeavours. Embrace the power of Node.js and npm to bring your JavaScript projects to life effortlessly. Happy coding!